

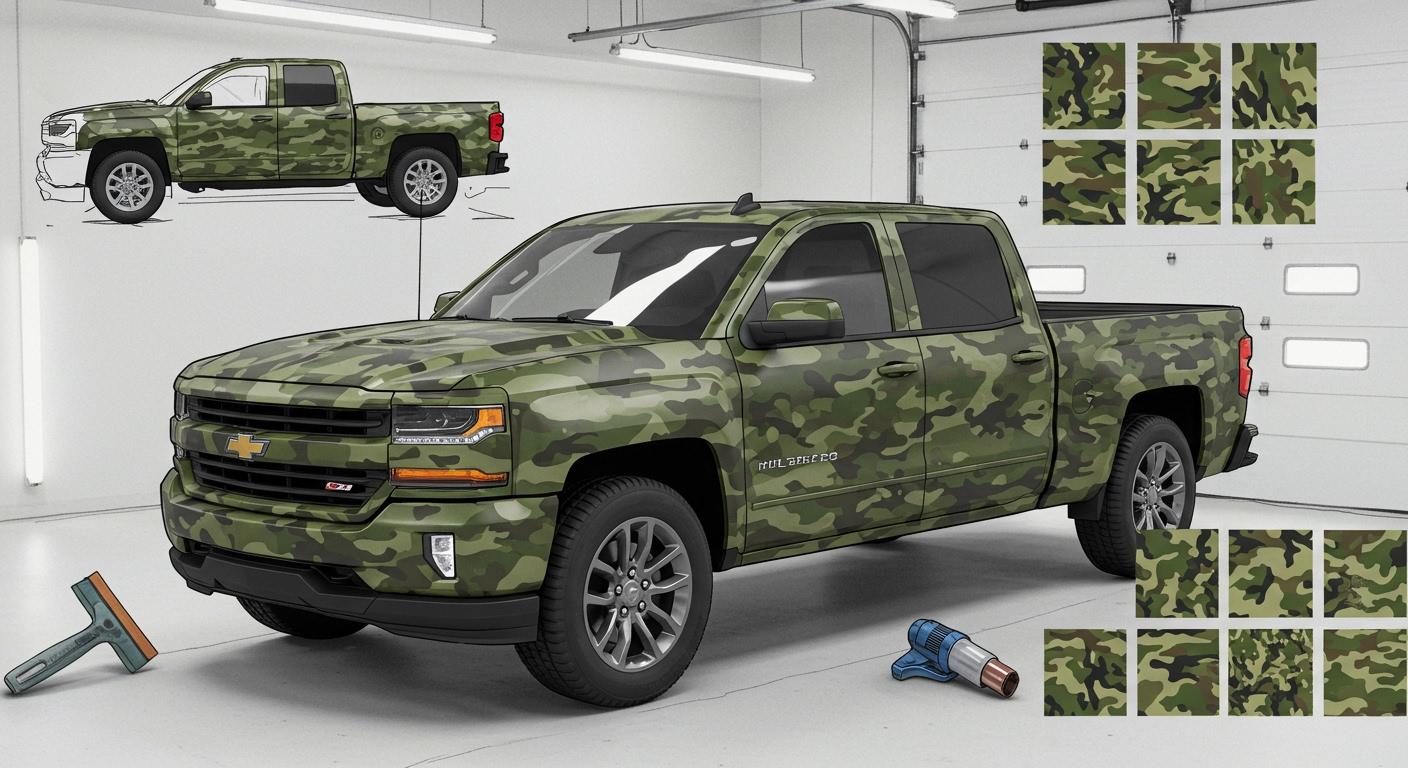
An excellent choice for a rugged, personalized look, a Silverado camo wrap transforms your truck's appearance. You can select from various popular patterns, including traditional woodland, modern digital, stark arctic, and subtle desert designs. You have two main installation paths. Professional installation ensures a perfect, bubble-free finish. A cost-effective DIY kit offers a rewarding, hands-on project for those with patience and precision.
Key Takeaways
- You can choose many camo patterns and finishes for your Silverado truck. These include woodland, digital, matte, and gloss options.
- You can install a camo wrap yourself or hire a professional. DIY saves money, but a professional ensures a perfect finish.
Exploring Silverado Camo Wrap Design Options
Selecting the right design is a crucial step in customizing your truck. You have many choices that affect your Silverado's final look, from the pattern itself to the type of coverage. This section explores your options to help you make the best decision.
Popular Camo Patterns for Your Truck
You can find a camo pattern that perfectly matches your style and environment. Many designs are available, each offering a unique aesthetic. Some of the most popular choices for trucks give you a wide range of looks.
- Mossy Oak Break-Up Country: This pattern uses leaves, bark, and shadows. It is a versatile choice for blending into wooded areas and is highly recommended for the Chevy Silverado.
- TrueTimber Urban Camo: This design features gray, black, and white tones. It creates a modern, sleek look for city environments.
- Kryptek Highlander: You might choose this pattern for its intricate, layered design. It works exceptionally well in desert and arid landscapes.
- Realtree Max-5: This pattern is ideal for waterfowl hunters. It includes reeds and grasses to help your truck blend in near marshes and fields.
- Digital Camo: This pixelated style offers a futuristic, tech-inspired statement. It helps your truck stand out rather than blend in.
Choosing the Right Finish: Matte vs. Gloss
The finish of your wrap dramatically changes its appearance and maintenance needs. You can choose between a high-shine gloss or a non-reflective matte. Each has distinct advantages.
| Characteristic | Gloss Finish | Matte Finish |
|---|---|---|
| Appearance | High-shine, paint-like look that enhances truck contours. | Flat, non-reflective surface that provides a modern, subtle look. |
| Pros | The smooth surface is easy to clean and resists fading. | It effectively hides minor dings, light scratches, and smudges. |
| Cons | Shows fingerprints and swirl marks more easily. | Requires specialized matte-specific cleaners and can show water spots. |
A gloss finish gives your truck a classic, polished shine similar to OEM paint. A matte finish offers a unique, stealthy appearance that conceals small imperfections on the truck's body.
The Installation Process: DIY vs. Professional

After choosing your design, you must decide how to apply the car wrap to your truck. You can hire a professional for a flawless result or tackle the project yourself. Each path has its own process and considerations.
Professional Installation: What to Expect
Choosing a professional installer gives you access to expertise and specialized tools. This ensures your wrap is applied correctly for a durable, paint-like finish. A qualified installer handles every step, from vehicle prep to the final post-heating.
Pro Tip: Before you commit, ask the installer some key questions to ensure they are the right fit for your project. You want to feel confident in their ability to handle your Silverado.
- What is your experience with truck wraps?
- Which vinyl brands do you use, and what are their warranties?
- Can you show me a 3D render of the design on my truck?
- How do you prepare the vehicle's surface before installation?
- What is your warranty policy for the installation service itself?
- Can you remove the wrap later without damaging my truck's paint?
- What will the total cost of the service be?
DIY Installation: A Step-by-Step Guide
A DIY installation can be a rewarding project if you have patience and a good workspace. A DIY silverado camo wrap kit gives you the materials you need for a hands-on approach. Success depends heavily on preparation and a controlled environment.
First, you need the right tools. A basic kit is often enough for smaller jobs, but a professional kit helps with complex curves.
- Squeegees (wiper, felt, contour)
- Heat gun
- Cutting tools (knifeless tape, precision knife)
- Cleaning supplies (isopropyl alcohol, microfiber cloths)
- Measuring tape
Your workspace is just as important as your tools. You should apply the wrap indoors in a clean, dust-free area.
Important: The ideal temperature for vinyl application is between 60°F and 80°F (15°C to 27°C). If it is too cold, the vinyl becomes brittle. If it is too hot, the adhesive can become overly aggressive and hard to manage.
Follow these general steps for a successful application:
- Clean the Surface: Wash your truck thoroughly to remove all dirt, wax, and grease. Wipe every panel with isopropyl alcohol right before you apply the vinyl.
- Measure and Cut: Measure each panel of your truck. Cut a piece of vinyl slightly larger than the panel to give yourself extra material to work with.
- Apply the Vinyl: Start from the center of the panel. Peel back a portion of the backing paper and gently lay the vinyl on the surface.
- Squeegee the Surface: Use a squeegee to press the vinyl onto the truck. Work from the center outward using smooth, overlapping strokes to push out air.
- Use Heat for Curves: Gently heat the vinyl with a heat gun to make it pliable for wrapping around curves, mirrors, and bumpers. Do not overheat or overstretch the material.
- Trim the Edges: Use knifeless tape or a precision knife to carefully trim the excess vinyl along panel edges and gaps.
- Post-Heat the Wrap: Go over all edges and curved areas with the heat gun one last time. This activates the adhesive and locks the vinyl in place.
Common Installation Mistakes and How to Avoid Them
DIY installations can be tricky. Knowing the common pitfalls helps you avoid them and achieve a better result. Rushing the process is the biggest cause of errors.
| Mistake | How to Avoid It |
|---|---|
| Improper Surface Prep | Clean the surface meticulously with soap, water, and isopropyl alcohol. Any remaining dirt or wax will prevent the vinyl from sticking. |
| Over-stretching Vinyl | Use a heat gun sparingly. Apply just enough heat to make the vinyl conform to curves without thinning it out or distorting the camo pattern. |
| Bubbles and Wrinkles | Apply the vinyl slowly from the center outward. If a bubble appears, gently lift the vinyl and reapply it. For a stubborn bubble, you can prick it with a pin and smooth it down. |
| Lifted Edges | Make sure you clean and post-heat all edges thoroughly. This ensures the adhesive creates a strong, lasting bond. |
| Using Low-Quality Wrap | Always purchase your wrap from a reputable brand. Cheaper materials are harder to install and will not last as long. |
Fixing mistakes is part of the learning process. For wrinkles, you can gently lift the vinyl, apply a little heat, and smooth it out again. For lifted edges, clean the area, use a heat gun to reactivate the adhesive, and press it down firmly with a squeegee.
A silverado camo wrap offers significant personalization and protects your truck's paint from scratches and UV damage. Your final decision balances budget and desired results, whether it's a flawless professional job or a rewarding DIY project. Here is a recommendation for you. If you wnant to wrap your truck with cmo wrap, you can Ravoony choose dolph camo wrap, a custom wrap, which is a very good choice for people with a tight budget.
FAQ
How long does a Silverado camo wrap last?
You can expect a quality camo wrap to last 3 to 5 years. Proper care and your local climate conditions will directly impact the wrap's overall lifespan.
Can I use an automatic car wash for my wrapped truck?
You should avoid automatic car washes. Their high-pressure jets and abrasive brushes can lift edges or scratch the vinyl. Hand washing is the safest cleaning method. 🧼
Will a camo wrap damage my truck's original paint?
No, a wrap protects your original paint. When installed and removed correctly, it shields the surface from minor scratches and UV damage, preserving the paint's condition.


0 Comments